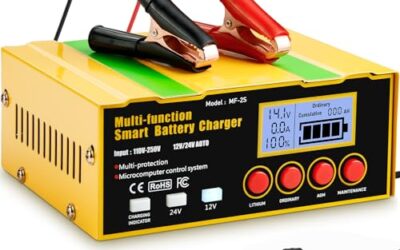

How to work a car battery charger safely: match its settings to your battery, connect the clamps in the right order, and follow the charger’s instructions. Before plugging in or switching on the charger, check your vehicle manual, battery label, charger manual, and charging area.
- Most conventional cars use 12-volt batteries, but confirm your vehicle and battery requirements before charging.
- Choose a charger mode that matches battery chemistry, such as lead-acid, AGM, or lithium, when applicable.
- Connect clamps with the charger unplugged or switched off, unless its manual gives another sequence.
- Stop if battery case is cracked, leaking, swollen, unusually hot, or giving off a strong odor.
- Follow vehicle-specific instructions for battery terminals, remote charging posts, and battery removal.
What to check before using a car battery charger
A charger sends electrical current into a battery to restore charge. Charger controls and connection steps vary, so the charger manual takes priority for its switches, indicators, and clamp order. The vehicle manual takes priority for battery access, terminal locations, and any rules for charging while the battery remains installed.
First, identify the battery voltage and chemistry. Many gasoline vehicles use 12-volt batteries, but that does not make every 12-volt charger suitable. A vehicle may use a flooded lead-acid, AGM, or other battery type. Some vehicles also have separate 48-volt systems, and electric vehicles use high-voltage traction batteries that an ordinary 12-volt charger cannot charge.
Read the battery label and vehicle manual. Match charger voltage and battery mode to those instructions. A wrong chemistry setting can use a charging profile that does not suit the battery. Do not guess from the vehicle’s age, model, or appearance.
Check whether your vehicle has a battery monitoring sensor or designated charging posts. Some vehicles require a negative clamp to connect to a chassis ground point instead of the battery’s negative post. This can let the vehicle’s monitoring system track charging correctly. The correct point is model-specific, so use the vehicle manual.
For more detail on a full recharge process, see how to recharge a car battery safely. If your battery must come out first, follow safe battery removal steps for your vehicle.
How to work a car battery charger: step-by-step
- Prepare a safe work area. Park the vehicle, switch off accessories and ignition, and set the parking brake. Work in a dry, ventilated area away from flames, sparks, cigarettes, or other ignition sources. Lead-acid batteries can release flammable gas while charging. Keep metal tools from bridging battery terminals.
- Inspect battery and charger. Do not charge a battery with a cracked, leaking, swollen, frozen, or badly damaged case. Check charger leads and clamps for damaged insulation, exposed wire, or loose parts. Stop and seek help if either item appears unsafe.
- Confirm charger settings. Check the charger label and manual for its supported voltage, chemistry, and charging mode. Choose a setting that matches the battery. A low-current mode may take longer; a higher-current mode is only suitable when charger and battery instructions allow it. Do not use an engine-start or boost mode as a normal charging setting unless its instructions call for that use.
- Keep charger power off. Unplug it or switch it off before attaching clamps, unless the charger manual specifically directs otherwise. Place the charger where it can stay dry and stable, with leads clear of moving engine parts, hot surfaces, and sharp edges.
- Connect the positive clamp. Attach the red positive clamp to the vehicle’s designated positive charging point. This is often the battery’s positive post, but some vehicles have a remote positive terminal. Use the connection point specified by the vehicle manual.
- Connect the negative clamp. Attach the black negative clamp to the designated negative point. Depending on vehicle instructions, this may be the battery’s negative post or an approved chassis ground. Do not assume one method works for all cars.
- Power the charger. Once clamps are secure, plug in or switch on the charger according to its manual. Select the approved battery mode if the charger does not prompt you automatically. Check the display or indicator for a fault, reverse-polarity warning, or charging status.
- Let charging proceed as directed. Keep the charger and battery in view. Do not cover the charger or place it on the battery. Smart chargers may lower current or stop when charging is complete, but indicator meanings differ by model. Use the manual to interpret them.
- Switch off before removing clamps. Turn off or unplug the charger first, following its instructions. Remove the negative clamp, then the positive clamp, unless the charger manual specifies a different sequence. Keep clamps from touching each other or metal parts.
- Check the result. If the charger indicates a full charge, start the vehicle only when the vehicle manual permits and the battery appears normal. A full-charge indicator does not prove that a weak or damaged battery can hold charge. If the vehicle will not start or the battery soon goes flat again, investigate the battery and charging system.
Connection order and charger settings
Connection order limits the chance of creating a spark near the battery. Many charger and vehicle procedures call for the positive clamp first and the negative clamp second, then removing them in reverse order after switching off power. Some vehicles specify a remote ground point. Follow both manuals, especially when their instructions differ from a general sequence.
Use the table as a quick check, not as a replacement for manuals. Exact terminology and indicators vary by charger.
| Check | What to do | Why it matters |
|---|---|---|
| Voltage | Match charger output to battery voltage. | A charger set for another voltage may not charge correctly and can damage equipment. |
| Battery chemistry | Select the approved mode for the battery label. | Charging profiles vary by battery construction. |
| Clamp points | Use terminal or remote connection points named in vehicle instructions. | Some vehicles require a specific ground point or charging post. |
| Current setting | Stay within charger and battery instructions. | Charging time and battery stress depend on current and battery condition. |
| Indicators | Check your charger manual for each light or code. | A blinking or fault light can mean different things across models. |
How long should a car battery charge?
Charging time depends on battery capacity, how depleted it is, charger output, battery condition, temperature, and charging mode. There is no single safe time that fits every battery and charger. A small maintainer may take much longer to recharge a depleted battery than a charger with a higher approved current.
Use the charger’s completion indicator and instructions instead of relying on a fixed number of hours. If the charger has a manual mode that does not stop automatically, monitor it for the full period specified by its maker. Do not leave a manual charger running unattended or connected longer than its instructions allow.
Cold conditions can slow charging, and a frozen lead-acid battery should not be charged. If you suspect the battery is frozen, do not connect a charger. Have the battery assessed in a suitable setting.
Can you charge a car battery while it is connected?
Often, a 12-volt battery can be charged while installed, but vehicle instructions decide whether that is acceptable. Modern vehicles may have sensitive electronics, battery monitoring systems, or special charging points. Some manufacturers require the battery to be disconnected or give a specific procedure for charging it in place.
Do not disconnect a battery just to make charging seem safer. Removing it can affect vehicle settings and may require a prescribed procedure. If the manual calls for removal, follow its directions. This battery installation guide explains why reconnecting also calls for care.
For a vehicle with a 48-volt system, hybrid system, or electric traction battery, use only equipment and procedures specified for the system. A standard 12-volt charger does not charge an EV’s high-voltage battery. It may be suitable for a separate 12-volt accessory battery only if the vehicle maker permits it.
Common mistakes when using a car battery charger
- Using the wrong battery mode: A lead-acid setting is not automatically right for AGM or lithium batteries. Read the battery label and charger manual.
- Reversing clamps: Red belongs on the designated positive point and black on the approved negative or ground point. Stop if the charger reports reversed polarity; do not bypass the warning.
- Connecting with charger power on: This can create sparks or trigger a charger fault. Start with power off unless its manual says otherwise.
- Charging a damaged battery: A cracked, leaking, swollen, or hot battery needs assessment, not a routine charge.
- Trusting a full indicator as a battery diagnosis: A charger reports charging status, but it may not establish battery health or identify an alternator fault.
- Using an extension cord without checking requirements: Follow the charger’s instructions for cord type, length, and electrical supply. Keep connections dry and protected.
- Leaving clamps attached after charging: Switch off or unplug first, then remove clamps in the specified order.
- Choosing a charger only by vehicle size: Battery type and charging requirements matter. The vehicle’s engine size alone does not identify the correct charger mode.
When to get professional help
Stop and seek qualified help if the battery is damaged, frozen, leaking, swollen, unusually hot, or producing a strong odor. Stop if the charger repeatedly shows a fault, the clamps heat up, or you see smoke or sparks. Do not touch hot or damaged cables. Move away from an unsafe battery area and contact roadside assistance or an automotive professional.
Ask for a battery and charging-system diagnosis when a charged battery repeatedly goes flat, the vehicle needs frequent jump-starts, or the charger cannot complete its cycle. Possible causes include a battery that can no longer hold charge, a charging-system fault, or electrical draw while parked. A charger alone cannot identify which cause applies.
For help deciding between a charger and a jump starter, read the practical differences between jump starters and smart chargers. The right choice depends on whether you need to recharge a battery, start a vehicle, or maintain charge during storage.
FAQ
Should a car be running while using a battery charger?
No. A battery charger is normally connected with the vehicle switched off. Follow the charger and vehicle manuals for any exception. Do not confuse a battery charger with a jump starter or alternator test procedure.
Can a car battery charger start a dead car?
Most chargers restore battery charge rather than provide the high current needed to start an engine immediately. Some units include a separate engine-start function. Use that function only as directed by its manual, and do not assume a deeply discharged or damaged battery will recover.
What does reverse polarity mean?
Reverse polarity means the positive and negative clamps are connected to the wrong points. Switch off or unplug the charger, correct the connection using the manuals, and check for damage if a spark or fault occurred. Never bypass a polarity warning.
Can I leave a charger connected overnight?
Only if its instructions allow that use and the charger is suitable for the battery. Smart chargers may have a maintenance mode, while manual chargers may require close monitoring. Check the model’s instructions before leaving any charger connected unattended.
Sources and further reading
- Battery Council International: Find general information on lead-acid batteries and battery safety.