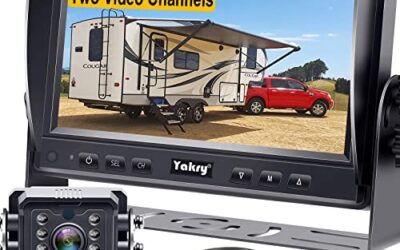

To wire a backup camera, connect its power and ground as its manual directs, then route the video cable to a compatible display and connect any reverse-trigger lead the system requires. On many vehicles, the reverse-light circuit provides the camera’s switched 12-volt power and tells an aftermarket receiver when to show the image, but the correct connection depends on the camera, receiver, and vehicle wiring.
- Read the camera and display wiring diagrams before choosing a power source or splicing a wire.
- Most wired systems need a camera power connection, a ground, and a video connection to the screen.
- A reverse-trigger wire may be separate from the video cable and may need to connect at both ends.
- Some factory electrical systems do not work well with a direct tap into the reverse-light circuit.
- Route cables away from airbags, moving parts, sharp edges, and hot surfaces.
What you need before wiring a backup camera
First, identify the system type. A basic aftermarket setup often has a camera at the rear, a display or stereo receiver at the front, and a long video cable between them. An integrated factory system may use vehicle-specific connectors, a control module, or software setup instead of a simple composite video connection.
Check the camera’s required voltage and the vehicle’s electrical system. Many passenger vehicles use 12-volt systems, but commercial vehicles and some equipment may use different voltages. Do not connect a camera to a supply outside its stated range. A 12-volt camera is not automatically suitable for a 24-volt vehicle.
Compare the camera output with the display input. Common setups use a yellow RCA-style composite video plug, but connector shape alone does not prove that two devices use the same video format or pinout. Some systems use proprietary connectors or digital video. The camera and screen must support compatible signals.
Gather the wiring diagram, trim tools, suitable wire connectors, and a digital multimeter. Use connectors and wire sizes appropriate for the circuit and the installation. If a camera kit includes a harness or fuse, follow its instructions rather than substituting an improvised connection.
How to wire backup camera power, ground, and video
- Plan the cable route. Locate a route from the rear camera to the display that avoids exhaust parts, hinges, seat tracks, and sharp metal edges. Keep wiring away from airbag modules and airbag deployment paths. Vehicle trim and airbag locations vary by model year, so consult service information if the route is unclear.
- Mount the camera and identify its leads. Fit the camera where the manufacturer permits, commonly near the rear license plate or a vehicle-specific mount. Identify power, ground, video, and any reverse-trigger wire from the camera diagram. Wire colors are not universal, so do not rely on color alone.
- Choose the camera power source. For a camera that should operate only in reverse, installers often use the reverse-light circuit as a switched supply. Use the vehicle wiring diagram to identify the correct circuit, then check the circuit with a multimeter while following safe vehicle procedures. Do not assume a wire’s function from its color or location.
- Connect the camera ground. Use the ground point or method specified for the camera. A poor ground can cause a blank, noisy, or intermittent image. If the manual calls for a chassis ground, choose a suitable point and make a secure connection without damaging nearby wiring or components.
- Run the video cable forward. Route the cable through existing grommets where practical, and protect it from abrasion at body openings. Connect the camera end and the display end firmly. If the video cable includes a thin auxiliary wire, check the kit diagram to learn whether it carries the reverse trigger or serves another purpose.
- Connect the display’s reverse input if required. An aftermarket receiver may have a dedicated reverse-signal input. Connect it to the vehicle’s reverse signal as the receiver instructions specify. Some cameras use a separate trigger wire that runs with the video cable; this wire is not necessarily connected the same way on every kit.
- Connect display power as directed. A monitor or receiver may use its own accessory power and ground connections. Do not assume that powering the camera also powers the screen. Follow the display wiring diagram, including any fuse requirements.
- Check operation before refitting trim. Secure the vehicle, keep people and objects clear of its path, and follow the owner’s manual for selecting reverse. Confirm that the display switches on and that the image is stable. Check for a correct orientation and useful view, then inspect the cable route and connections before replacing trim.
Where should the camera get power?
The right source depends on when the camera needs to operate. A reverse-light feed can switch the camera on only while the vehicle is in reverse, which is suitable for many basic rear-view setups. A system intended to provide a live view outside reverse may need a different switched supply or a dedicated control module. Follow the camera maker’s wiring diagram for that operating mode.
| Power approach | What it does | Important limit |
|---|---|---|
| Reverse-light circuit | Can power the camera when reverse is selected. | Some vehicles use monitored, pulsed, or electronically controlled lighting circuits that may not suit a direct camera connection. |
| Switched accessory supply | Can power a camera while the ignition or accessory system is on. | The camera may stay on when the vehicle is not in reverse, depending on its control setup. |
| Dedicated interface or harness | Can connect with a vehicle’s factory wiring or display system. | Fitment and setup depend on the vehicle’s model year, trim, and factory equipment. |
Some modern vehicles monitor lighting circuits for faults or control them electronically. A direct tap can cause flicker, a dashboard warning, or camera instability. In those cases, a vehicle-specific interface or an isolated relay may be needed, but the correct solution depends on the circuit and camera instructions. Do not add a relay or draw power from an unfamiliar wire without confirming the circuit requirements.
Wired camera connection checklist
- The camera voltage matches the vehicle supply and the camera’s stated requirements.
- The camera and display use compatible video formats and connectors.
- Camera power and ground follow the camera’s wiring diagram.
- The display receives a reverse signal if its automatic switching feature requires one.
- Any extra wire in the video cable is connected only as the kit diagram directs.
- Connections are insulated and secured, and wiring is protected from heat, movement, and abrasion.
- The camera view appears before interior trim is refitted.
Why compatibility changes by vehicle
Vehicle model year and factory equipment can change where a reverse signal is available and how the factory screen accepts video. A receiver may need a separate reverse input even when the camera has power. Some factory systems require a compatible interface or configuration, while others do not accept an aftermarket camera signal directly.
Bulb-out warnings, flickering lights, or a camera that switches on and off can point to an electronically controlled lighting circuit. They do not, by themselves, prove which part is at fault. Check the vehicle wiring diagram and camera instructions before changing the connection. For a box truck or trailer, cable length, mounting, and connector needs can differ from a passenger-car installation; see our guide to a backup camera for a box truck for related setup considerations.
Wireless cameras reduce the need to run a long video cable, but they still need power and a compatible receiver. The trade-offs are different from a wired setup, especially for trucks and trailers. Our article on wireless backup cameras for trucks and trailers covers that installation option.
Common mistakes when wiring a backup camera
- Assuming wire colors are standard: Colors differ across vehicles and camera kits. Identify wires from the correct diagrams and confirm circuits with a meter.
- Connecting only the video cable: Video carries the picture, not necessarily camera power or the receiver’s reverse signal.
- Tapping a reverse lamp without checking the circuit: A monitored or pulsed circuit can lead to warnings or an unstable image.
- Mixing up the trigger lead and video connection: A thin wire beside an RCA cable may be a trigger lead, but its role depends on the kit.
- Leaving wiring loose: A cable can chafe, snag, or interfere with moving parts if it is not secured and protected.
- Refitting trim before checking the image: A loose plug or misplaced trigger connection is easier to address before panels are back in place.
When to get professional help
Ask an automotive electronics installer for help if the vehicle has a factory camera or display, an unfamiliar data-controlled reverse circuit, or wiring that passes near an airbag system. Professional help is also sensible if the camera causes a warning light, the reverse lamps behave differently after installation, or the display remains blank after you have checked the connections against the diagrams.
Stop if you cannot identify a wire safely, if the vehicle’s wiring differs from its service information, or if a connection requires cutting into a sealed or unfamiliar harness. A camera installation should not compromise vehicle safety systems or factory wiring.
Related reading: Wireless Backup Camera Buying Guide.
Frequently asked questions
Can I connect a backup camera to the reverse-light wire?
Often, but not on every vehicle or camera. The circuit must suit the camera’s voltage and current needs, and some vehicles use monitored or pulsed lighting circuits. Follow the vehicle and camera wiring diagrams.
Does a backup camera need its own ground?
The camera needs the ground connection specified by its manufacturer. That may be a designated ground wire or a suitable chassis connection. A weak ground can cause an unstable or missing image.
Why does my screen stay blank when I shift into reverse?
Possible causes include a missing reverse trigger, a camera without power, a poor ground, a loose video plug, or incompatible video signals. Check the wiring diagram and connections before replacing parts.
Can I wire a backup camera to a 24-volt vehicle?
Only if the camera and any connected equipment support that supply, or the installation uses an appropriate power converter as directed. A camera intended for 12-volt systems should not be connected directly to a 24-volt supply.